Open OnDemand: Difference between revisions
Added support |
|||
| (14 intermediate revisions by 2 users not shown) | |||
| Line 15: | Line 15: | ||
|- | |- | ||
|[[ARC Cluster Guide|ARC Cluster]] | |[[ARC Cluster Guide|ARC Cluster]] | ||
|ood-arc.rcs.ucalgary.ca | |[https://ood-arc.rcs.ucalgary.ca ood-arc.rcs.ucalgary.ca] | ||
|} | |} | ||
| Line 39: | Line 39: | ||
* RStudio (via VNC as a desktop application) | * RStudio (via VNC as a desktop application) | ||
* RStudio Server | * RStudio Server | ||
* VNC Remote Desktop | * VNC Remote Desktop (software rendering) | ||
* VNC Remote Desktop | * VNC Remote Desktop (VirtualGL rendering) | ||
=== Jupyter Notebooks === | === Jupyter Notebooks === | ||
Open OnDemand offers Jupyter Notebooks via containers or environment modules. For most users, we recommend using the containers way to launch your Jupyter notebooks as it is the simplest. However, we also offer the environment module based method for users that already have a working workflow based on environment modules. | |||
==== Container-based Jupyter notebooks ==== | |||
[[File:Open OnDemand Jupyter.jpg|alt=Open OnDemand Jupyter Notebook|thumb|Open OnDemand Jupyter Notebook ]] | [[File:Open OnDemand Jupyter.jpg|alt=Open OnDemand Jupyter Notebook|thumb|Open OnDemand Jupyter Notebook ]] | ||
We offer a selection of different Jupyter Notebooks derived from the | We offer a selection of different Jupyter Notebooks derived from the [https://jupyter-docker-stacks.readthedocs.io/en/latest/using/selecting.html. official Jupyter Stacks Docker images]. We will provide updated images with major ARC upgrades. The following flavors of Jupyter notebooks are currently available: | ||
{| class="wikitable" | |||
! | |||
!Image | |||
!Description | |||
|- | |||
|Spark Notebook | |||
|all-spark-notebook_spark-#.#.#.sif | |||
|Includes Python, R, and Scala support for Apache Spark. | |||
Spark version is listed in the filename. | |||
|- | |||
|Julia Data Science Notebook | |||
|datascience-notebook_julia-#.#.#.sif | |||
|Includes libraries for data analysis from the Julia, Python, and R communities. | |||
Julia version is listed in the filename. | |||
|- | |||
|Python Scipy Notebook | |||
|scipy-notebook_python-#.#.#.sif | |||
|Includes Python support for Apache Spark. | |||
Python version is listed in the filename | |||
|- | |||
|Tensorflow Notebook | |||
|tensorflow-notebook_tensorflow-#.#.#.sif | |||
|Based on the Scipy notebook but includes Tensorflow. | |||
Tensorflow version is listed in the filename. | |||
|- | |||
| | |||
|gpu-jupyter.sif | |||
|Includes NVIDIA CUDA along with the data science notebook. | |||
Based on https://github.com/iot-salzburg/gpu-jupyter/ | |||
|} | |||
To select the flavour of your notebook, select the desired image in the drop-down menu in the launch page. You may optionally use a custom image as well by selecting 'Custom Singularity Image...' (see the next section below). You may also specify any additional arguments to Jupyter including whether to launch JupyterLab instead. | |||
===== Create a custom Jupyter Notebook image ===== | |||
If additional packages are required in the notebook, you can create and use a customized container image and use it with Open OnDemand. As all the jupyter notebook images are based on Ubuntu with mamba, you may install additional packages using <code>apt-get</code>, <code>mamba</code>, and <code>pip</code>. | |||
To build a custom container image, create a Singularity build definition file that references the appropriate base jupyter notebook image. All custom Jupyter images should be based off of the base Jupyter notebook image for compatibility. In the following example, we will extend the <code>tensorflow-notebook</code> image with a C++ compiler (g++) and an additional pip package (corels). | |||
Create a Singularity build file <code>custom-notebook.def</code> with the following contents: | |||
{{Highlight|code=Bootstrap: docker | |||
From: jupyter/tensorflow-notebook | |||
%post | |||
apt-get autoremove; \ | |||
apt-get update --yes; \ | |||
apt-get install --yes --no-install-recommends g++; \ | |||
pip install corels|lang=text}} | |||
To build <code>custom-notebook.def</code>, run: <code>singularity build custom-notebook.sif custom-notebook.def</code>. This will generate a <code>custom-notebook.sif</code> singularity image file. | |||
To use this custom image in Open OnDemand, move the newly generated <code>.sif</code> file to <code>$HOME/ondemand/jupyter</code>. In Open OnDemand, when launching a new notebook, select 'Custom Singularity Image...' on the launch page and select the appropriate <code>.sif</code> file. | |||
==== Environment module based Jupyter notebooks ==== | |||
This is the alternative way of launching Jupyter notebooks on Open OnDemand. This option automates our previous recommended way of running Jupyter on ARC (described on our [[Jupyter Notebooks|Jupyter Notebooks page]]) by loading python from an Anaconda environment and creating a port forwarding. We recommend this option '''only''' if you have an existing workflow that uses Jupyter with modules. | |||
When using this method, you will be asked for an initialization bash script that sets up and starts Jupyter. An example script is given below. You may modify and add to this example script to customize your Jupyter Notebook setup. If no script is given when launching the notebook or if the script is not found, this example script will be used instead. | |||
= | {{Highlight|code=#!/bin/bash | ||
# TODO: Set up your environment as required. | |||
# | # Purge the module environment to avoid conflicts | ||
module purge | |||
module load python/anaconda3-2018.12 | |||
# TODO: Add any additional modules desired here. | |||
module list | |||
# As per https://rcs.ucalgary.ca/index.php/Jupyter_Notebooks | |||
unset XDG_RUNTIME_DIR | |||
# Launch the Jupyter Notebook Server | |||
}} | set -x | ||
jupyter notebook --config="${CONFIG_FILE}"|lang=bash}} | |||
=== Remote Desktop === | === Remote Desktop === | ||
Remote desktops may be helpful when exploring data or to run certain GUI based applications. Previously, we required users to manually set up and use X11 forwarding or VNC via SSH tunnels. The Open OnDemand Desktop app simplifies the process of launching a full Linux desktop session or other graphical based applications all within your web browser. We currently offer only XFCE as the desktop manager. | Remote desktops may be helpful when exploring data or to run certain GUI based applications. Previously, we required users to manually set up and use X11 forwarding or VNC via SSH tunnels. The Open OnDemand Desktop app simplifies the process of launching a full Linux desktop session or other graphical based applications all within your web browser. We currently offer only XFCE as the desktop manager. The desktop can run with either software rendering or hardware (via VirtualGL) rendering. VirtualGL rendering may only be used only on specific nodes and is currently not publicly available. | ||
Remember, your desktop will run as an interactive job on the Slurm cluster and will be subject to a maximum time limit before it is terminated. As a result, you will need to restart your desktop after the time limit is reached. When using this desktop feature, be sure to save your work frequently and be mindful of the remaining time left for your session to avoid loss of work. | |||
To get started, | To get started, click on 'Desktop (Software)' from the Interactive Apps menu. Select the desired partition that your desktop will run on. | ||
[[File:Open OnDemand Desktop.jpg|alt=Open OnDemand Desktop|none|thumb|Open OnDemand Desktop]] | [[File:Open OnDemand Desktop.jpg|alt=Open OnDemand Desktop|none|thumb|Open OnDemand Desktop]] | ||
Use the launch page to specify the resources your session should need. You may optionally request for a dedicated GPU for VirtualGL based sessions. | Use the launch page to specify the resources your session should need. You may optionally request for a dedicated GPU for VirtualGL based sessions. | ||
Once you launch the remote desktop job, you will be presented with a notification once it starts. Depending on how busy the cluster is and the requested resources, you may need to wait. Once started, you will see the option to launch the Remote Desktop in green: | Once you launch the remote desktop job, you will be presented with a notification once it starts. Depending on how busy the cluster is and the requested partition and resources, you may need to wait. Once started, you will see the option to launch the Remote Desktop in green: | ||
[[File:Open OnDemand Desktop Launch.png|alt=Open OnDemand Desktop Launch|none|thumb|Open OnDemand Desktop Launch]] | [[File:Open OnDemand Desktop Launch.png|alt=Open OnDemand Desktop Launch|none|thumb|Open OnDemand Desktop Launch]]Click on the blue "Launch Desktop" button to connect to your desktop. | ||
[[File:Remote Desktop on Open OnDemand.png|alt=Remote Desktop on Open OnDemand|none|thumb|Remote Desktop on Open OnDemand]]You may connect to CIFS/Samba shares through the desktop. Do so by opening the Thunar file manager and entering a SMB address: | |||
[[File:Thunar SMB connection.png|alt=Thunar SMB connection|none|thumb|Thunar SMB connection]] | |||
=== RStudio === | === RStudio === | ||
You may launch RStudio (a desktop application) through Open OnDemand. The desktop application is similar to a Remote Desktop session but will automatically load and start RStudio. | You may launch RStudio (a desktop application) through Open OnDemand. After launching a RStudio session, connect to it as | ||
[[File:RStudio | [[File:RStudio launch on OOD.png|alt=Launch RStudio on Open OnDemand|none|thumb|Launch RStudio on Open OnDemand]]The desktop application is similar to a Remote Desktop session but will automatically load and start RStudio. | ||
[[File:RStudio via VNC.png|alt=RStudio via VNC|none|thumb|RStudio via VNC]] | |||
=== RStudio Server === | === RStudio Server === | ||
| Line 87: | Line 145: | ||
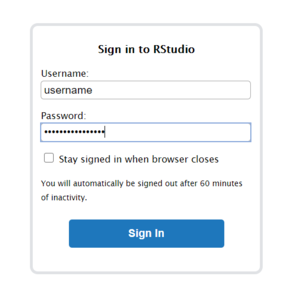
After clicking on 'Connect to RStudio Server', you will need to enter the username and password that are displayed: | After clicking on 'Connect to RStudio Server', you will need to enter the username and password that are displayed: | ||
[[File:RStudio Server Login.png|alt=RStudio Server Login|none|thumb|RStudio Server Login]] | [[File:RStudio Server Login.png|alt=RStudio Server Login|none|thumb|RStudio Server Login]] | ||
== Troubleshooting == | |||
=== VNC session cannot reconnect === | |||
If your VNC session closed, you may need to re-connect by going back to the Open OnDemand dashboard, listing your sessions under "My Interactive Sessions" page, then click on the blue "Launch Desktop" button. | |||
{{Support}} | |||
[[Category:ARC]] | |||
{{Navbox ARC}} | |||
Latest revision as of 21:14, 21 September 2023
Open OnDemand is a web portal for accessing certain clusters operated by Research Computing Services. The web portal provides a convenient way to access the login node, your files, and certain graphical applications such as Jupyter Notebooks and remote desktops. This service is an additional way to access HPC resources in addition to the existing command-line based options.
Open OnDemand is an open source project actively developed by the Ohio Supercomputer Center.
Access
Get an account
Before using Open OnDemand, you will need to have an account on the cluster. If you do not already have an account, please review the cluster's quick start guide for information on getting started.
Connect to OnDemand
You may access Open OnDemand for the following clusters using your UCIT credentials. Sign-on is handled through the University's Single Sign-On mechanism and requires Multi-Factor Authentication enabled.
| Cluster | Open OnDemand Access |
|---|---|
| ARC Cluster | ood-arc.rcs.ucalgary.ca |
Open OnDemand Dashboard
After logging in, you will see the Open OnDemand dashboard. The Message Of The Day (MOTD) will show any news and announcements relating to the cluster. Any quota warnings will also be displayed on your dashboard.

Other components and applications can be accessed through the top navigation.
File Browser
The file browser interface allows you to manage, upload, or download files from your directories, drag & drop file management, and basic file viewing and editing. You can access all files across all filesystems available to the cluster with this interface.
There is a 128 MB limit on file uploads. Please do not use this interface for large file transfers and instead look at other methods for file transfers.
Job Explorer
You may view and manage your current jobs on the cluster through the Active Jobs page. This may be helpful for users new to visualize scheduled jobs in Slurm.
Shell Access
You can launch a SSH session via Shell Access to the login node of the cluster.
Interactive Applications
We have created a small selection of graphical applications launchable through Open OnDemand. We currently offer:
- Jupyter Notebook / Jupyter Lab
- RStudio (via VNC as a desktop application)
- RStudio Server
- VNC Remote Desktop (software rendering)
- VNC Remote Desktop (VirtualGL rendering)
Jupyter Notebooks
Open OnDemand offers Jupyter Notebooks via containers or environment modules. For most users, we recommend using the containers way to launch your Jupyter notebooks as it is the simplest. However, we also offer the environment module based method for users that already have a working workflow based on environment modules.
Container-based Jupyter notebooks
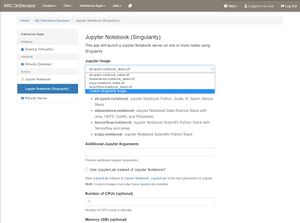
We offer a selection of different Jupyter Notebooks derived from the official Jupyter Stacks Docker images. We will provide updated images with major ARC upgrades. The following flavors of Jupyter notebooks are currently available:
| Image | Description | |
|---|---|---|
| Spark Notebook | all-spark-notebook_spark-#.#.#.sif | Includes Python, R, and Scala support for Apache Spark.
Spark version is listed in the filename. |
| Julia Data Science Notebook | datascience-notebook_julia-#.#.#.sif | Includes libraries for data analysis from the Julia, Python, and R communities.
Julia version is listed in the filename. |
| Python Scipy Notebook | scipy-notebook_python-#.#.#.sif | Includes Python support for Apache Spark.
Python version is listed in the filename |
| Tensorflow Notebook | tensorflow-notebook_tensorflow-#.#.#.sif | Based on the Scipy notebook but includes Tensorflow.
Tensorflow version is listed in the filename. |
| gpu-jupyter.sif | Includes NVIDIA CUDA along with the data science notebook. |
To select the flavour of your notebook, select the desired image in the drop-down menu in the launch page. You may optionally use a custom image as well by selecting 'Custom Singularity Image...' (see the next section below). You may also specify any additional arguments to Jupyter including whether to launch JupyterLab instead.
Create a custom Jupyter Notebook image
If additional packages are required in the notebook, you can create and use a customized container image and use it with Open OnDemand. As all the jupyter notebook images are based on Ubuntu with mamba, you may install additional packages using apt-get, mamba, and pip.
To build a custom container image, create a Singularity build definition file that references the appropriate base jupyter notebook image. All custom Jupyter images should be based off of the base Jupyter notebook image for compatibility. In the following example, we will extend the tensorflow-notebook image with a C++ compiler (g++) and an additional pip package (corels).
Create a Singularity build file custom-notebook.def with the following contents:
Bootstrap: docker
From: jupyter/tensorflow-notebook

%post
        apt-get autoremove; \
        apt-get update --yes; \
        apt-get install --yes --no-install-recommends g++; \
        pip install corels
To build custom-notebook.def, run: singularity build custom-notebook.sif custom-notebook.def. This will generate a custom-notebook.sif singularity image file.
To use this custom image in Open OnDemand, move the newly generated .sif file to $HOME/ondemand/jupyter. In Open OnDemand, when launching a new notebook, select 'Custom Singularity Image...' on the launch page and select the appropriate .sif file.
Environment module based Jupyter notebooks
This is the alternative way of launching Jupyter notebooks on Open OnDemand. This option automates our previous recommended way of running Jupyter on ARC (described on our Jupyter Notebooks page) by loading python from an Anaconda environment and creating a port forwarding. We recommend this option only if you have an existing workflow that uses Jupyter with modules.
When using this method, you will be asked for an initialization bash script that sets up and starts Jupyter. An example script is given below. You may modify and add to this example script to customize your Jupyter Notebook setup. If no script is given when launching the notebook or if the script is not found, this example script will be used instead.
#!/bin/bash

# TODO: Set up your environment as required.

# Purge the module environment to avoid conflicts
module purge
module load python/anaconda3-2018.12
# TODO: Add any additional modules desired here.
module list

# As per https://rcs.ucalgary.ca/index.php/Jupyter_Notebooks
unset XDG_RUNTIME_DIR

# Launch the Jupyter Notebook Server
set -x
jupyter notebook --config="${CONFIG_FILE}"
Remote Desktop
Remote desktops may be helpful when exploring data or to run certain GUI based applications. Previously, we required users to manually set up and use X11 forwarding or VNC via SSH tunnels. The Open OnDemand Desktop app simplifies the process of launching a full Linux desktop session or other graphical based applications all within your web browser. We currently offer only XFCE as the desktop manager. The desktop can run with either software rendering or hardware (via VirtualGL) rendering. VirtualGL rendering may only be used only on specific nodes and is currently not publicly available.
Remember, your desktop will run as an interactive job on the Slurm cluster and will be subject to a maximum time limit before it is terminated. As a result, you will need to restart your desktop after the time limit is reached. When using this desktop feature, be sure to save your work frequently and be mindful of the remaining time left for your session to avoid loss of work.
To get started, click on 'Desktop (Software)' from the Interactive Apps menu. Select the desired partition that your desktop will run on.
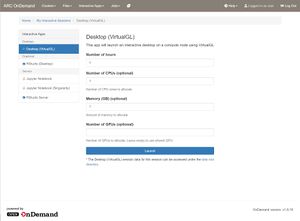
Use the launch page to specify the resources your session should need. You may optionally request for a dedicated GPU for VirtualGL based sessions.
Once you launch the remote desktop job, you will be presented with a notification once it starts. Depending on how busy the cluster is and the requested partition and resources, you may need to wait. Once started, you will see the option to launch the Remote Desktop in green:
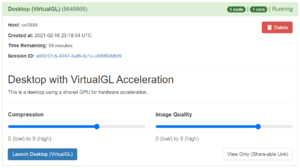
Click on the blue "Launch Desktop" button to connect to your desktop.
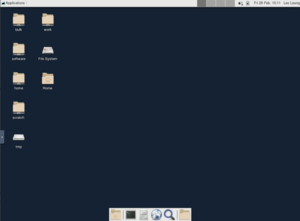
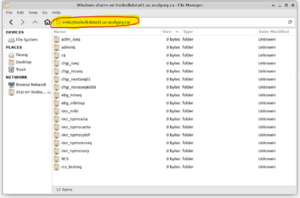
You may connect to CIFS/Samba shares through the desktop. Do so by opening the Thunar file manager and entering a SMB address:
RStudio
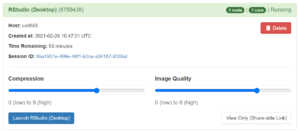
You may launch RStudio (a desktop application) through Open OnDemand. After launching a RStudio session, connect to it as
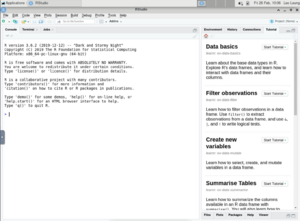
The desktop application is similar to a Remote Desktop session but will automatically load and start RStudio.
RStudio Server
RStudio Server is a web-based version of RStudio and functions similar to Jupyter Notebooks. After requesting for a RStudio Server session through Open OnDemand, you will see a session information box similar to the one below. Each session will use a randomized password.
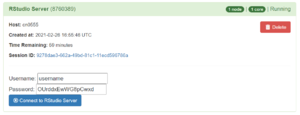
After clicking on 'Connect to RStudio Server', you will need to enter the username and password that are displayed:
Troubleshooting
VNC session cannot reconnect
If your VNC session closed, you may need to re-connect by going back to the Open OnDemand dashboard, listing your sessions under "My Interactive Sessions" page, then click on the blue "Launch Desktop" button.
|
Do you need assistance, have questions or concerns? Please do not hesitate to contact us at support@hpc.ucalgary.ca.
|