Apache Spark on Marc
Overview
This guide gives an overview of running Apache Spark clusters under the existing scheduling system of the Level 3/4 Rated Marc cluster at the University of Calgary.
Due to certain mandatory security restrictions required when accessing Level 3 and 4 data, we are not able to provide access to Sparc via Open On Demand as it is done on Arc. There is a slightly more complicated procedure to access Spark and the associated Jupyter notebook but it is only slightly more difficult.
Connecting
- Login to Marc normally as described on [MARC_accounts]
- Start the Jupyter notebook and Spark cluster as a job with something like the following (changing the number of cpus and memory to fit your requirements:
sbatch -N1 -n 38 --cpus-per-task=1 --mem=100G --time=1:00:00 /global/software/spark/sparkOnMarc/sparkOnMarc.sh
Submitted batch job 14790
- The above command will return a job number "14790" in this example. A file named slurm-<jobnumber>.out will be created in the current directory. After a few moments the file will contain the connection information required for you to access a Jupyter notebook that has access to the Spark cluster that was just started.
$ cat slurm-14790.out
<snip -- lots of logging messages that can be ignored unless there's problems>
Discovered Jupyter Notebook server listening on port 54674!
===========================================================================
===========================================================================
===========================================================================
Your Jupyter Notebook with Spark cluster is now active.  Inside Putty
You will now need to forward port 8888 to:

sg5:54674

Then you can point your browser started from myappmf.ucalgary.ca to
the URL:

Currently
http://localhost:8888/?token=dccb02273b9be90c833edf658fd3183aa62fa9fabadce6d8

Please see the RCS website rcs.ucalgary.ca for information on how to
access Spark from the Jupyter notebook.

===========================================================================
===========================================================================
===========================================================================
- This message says that the Jupyter server is running on node sg5 on port 54674. Port 8888 needs to be forwarded from the server running Putty to the cluster.
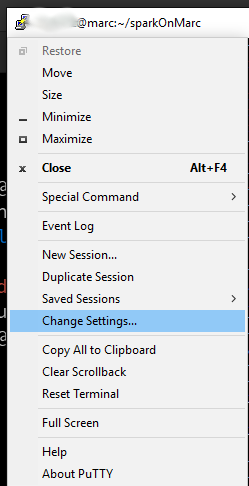
- Click the Putty icon in the upper left corner of the Putty window and select "Change Settings"

- If there's already 8888 listed in the Forwarded ports box click it and click Remove -- the Forwarded ports box should be empty.
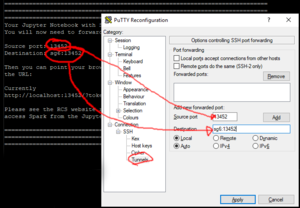
- In the Change Settings dialogue box pick "Tunnels" in the left hand box (you'll have to open the Various levels of the tree to get there)
- Enter 8888 into the Source port box

Putty Settings dialogue box showing the required port forwarding. - Copy the circled value from the putty window into the Destination box and click the Add button.
- The "Forwarded ports" box should now contain a concatenation of the text in the source port and destination boxes. i.e. "8888:sg4:54674"
- Click Apply
- Return to the myappmf tab in your browser and start a Google Chrome there. Note: It is important that you use the Chrome from myappmf not your desktop.
- Paste the link containing http://localhost:8888?token= found in the putty terminal window into the browser started from myappmf and you should be rewarded with a Jupyter Notebook session.
Troubleshooting Forwarding
- There are a number of things that can go wrong with the port forwarding above.
Problem: The job running the Jupyter notebook and Spark cluster can run out of time in which case you'll have to start a new Jupyter/Spark job.
Solution: Start a new on and follow the solution to the next problem to "clean up"
Problem: The port forwarding from a previous job is still active.
Solution: Go through every Putty window that you have open and make sure the forwarded ports box is clear in every running Putty window.
Problem: Someone else already has port 8888 in use on the machine that runs Putty.
Solution: Try 8889 (or some other number above 1024 and below 65535). You'll haved to set Source port in the putty forward to this new port number and edit the URL that gives you the Jupyter notebook (change the :8888 to :8889 etc.)
In your Python file or terminal load the appropriate python modules and instantiate the cluster:
import os
import atexit
import sys
import re

import pyspark
from pyspark.conf import SparkConf
from pyspark.context import SparkContext
from pyspark.sql import SQLContext
conflines=[tuple(a.rstrip().split(" ")) for a in open(os.environ['SPARK_CONFIG_FILE']).readlines()]
conf=SparkConf()
conf.setAll(conflines)
conf.setMaster("spark://%s:%s"% (os.environ['SPARK_MASTER_HOST'],os.environ['SPARK_MASTER_PORT']))
sc=pyspark.SparkContext(conf=conf)

#You need this line if you want to use SparkSQL
sqlCtx=SQLContext(sc)

#YOUR CODE GOES HERE
You now have a sc (Spark Context) and sqlCtx (SQL Context) objects to operate on. Please remember to return to the OOD screen and terminate the Jupyter + Spark app when you are finished.
There are many Spark tutorials out there. Here are some good places to look:
- https://spark.apache.org/docs/latest/quick-start.html
- https://spark.apache.org/docs/latest/rdd-programming-guide.html
- https://spark.apache.org/docs/latest/sql-programming-guide.html
HINT: It helps to google "pyspark" as that returns Python results instead of Scala which is another common language used to interact with Spark.