CloudStack User Guide
This is a user's guide on using CloudStack provided by Research Computing Services.
Introduction
Apache CloudStack is an Infrastructure as a Service (IaaS) platform that allows users to quickly spin up Linux/Non-Windows based virtual machines. RCS is providing this service to help researchers quickly set up and prototype short-term research related software on premises. CloudStack is not appropriate for long term (multi-year) workloads or workloads that depend on Windows. All CloudStack accounts are subject to a yearly renewal request. Services set up on CloudStack virtual machines can be accessed from the campus network and also the internet if required.
Access to CloudStack can be requested via ServiceNow.
Please refer to our CloudStack End User Agreement for acceptable uses and requirements.
Accessing the CloudStack management console
The CloudStack management console is a web-based portal that allows you to view and manage your cloud infrastructure including virtual machines, storage, and network. Any modern web browsers including Chrome, Firefox, Edge, and Safari is supported.
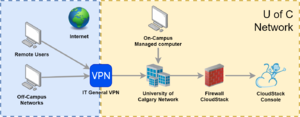
Access the CloudStack management console is possible only from an IT-managed computer or through the IT General VPN when working on unmanaged machines (eg. AirUC) or when working off campus (eg. at home). Please review the IT knowledge base article on connecting to the General VPN or contact IT support if you need assistance connecting to the General VPN.
Login to CloudStack
To log in to CloudStack, navigate to https://cloudstack.rcs.ucalgary.ca/. If this site fails to load, please make sure you are either on a IT managed computer or connected to the General VPN.
Sign in to CloudStack using the Single Sign-On option as shown in the image below. This method will require you to authenticate through our central authentication service using your University of Calgary IT credentials and will require multi-factor authentication. You must have multi-factor authentication set up either via your phone or with the Microsoft Authenticator app.
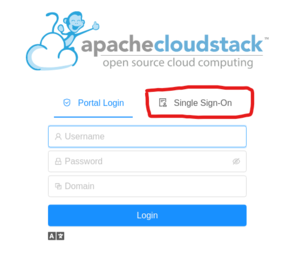
Note: Due to a bug with the UI, if the Single Sign-On option is disabled, please refresh the login page and try again. This issue should be addressed in our next update for CloudStack.
CloudStack Dashboard
After logging in, you will be presented with your CloudStack management console. The dashboard shows you a general overview of your account's status.
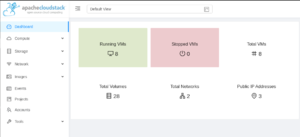
On the right hand side of the dashboard, you will also see recent activity and events that was done within your CloudStack account.
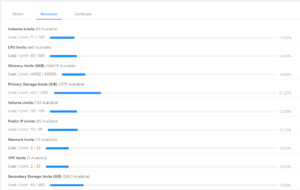
If you wish to see your CloudStack account resource quota and allocation, navigate to: Accounts -> Click on your account -> Resources.
Working with virtual machines
CloudStack allows you to control the lifecycle of virtual machines within your cloud account. VMs may be started, stopped, rebooted, or destroyed within your management console.
Create a VM
To create a new VM, enter the CloudStack management console and navigate to: Compute -> Instances -> Add Instance
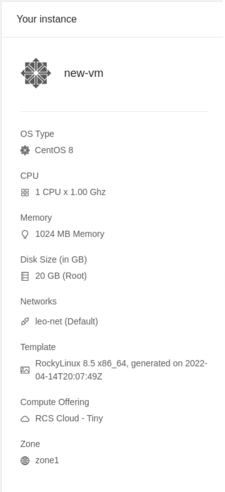
Virtual Machines require the following details:
- Deployment zone. Your account will already be placed in the appropriate zone.
- Boot template or ISO. You may choose either a pre-created template or boot from a custom CD-ROM ISO file.
- Compute offering. You may select an appropriate size for your new VM. Resources will be counted against your account's quota.
- Data Disk. You may choose to add an additional virtual disk to your VM to store your data. Alternatively, if you wish to use a single virtual disk for your VM, you may choose to override the size of your root disk in step 2 and select 'No thanks' in this step.
- Networks. You may choose one or more networks your VM should connect to. All CloudStack accounts come with a default network already created and ready to be used.
- SSH keypairs. For templates that support custom SSH key pairs, you may choose to use a custom SSH keypair to be installed as part of the deployment process.
- Advanced settings. For templates that support custom user-data (Cloud-Init), you may choose to enable the advanced settings and provide your own Cloud-Init user-data payload. More on this in the advanced tasks section below.
- Other VM details. You may give your new VM a friendly name and make it part of a group. Groups allow you to group related VMs together for better organization. You may change these details at a later time.
When you are done, review the instance summary on the right hand side and then click on the 'Launch Virtual Machine' button.
Choosing a virtual machine template
We provide a Rocky Linux 8.5 and a Ubuntu Server 22.04 LTS template for your convenience. These templates are pre-built images with the operating system installed and ready for use. Our templates also support further automated setup configured using Cloud-Init configuration data that can be provided when deploying a new VM. Currently, we offer the following templates:
| Template | Cloud-Init Support | Password Support | Default Username |
|---|---|---|---|
| Rocky Linux 8.5 | Yes | Yes | rocky |
| Ubuntu Server 22.04 | Yes | Yes | ubuntu |
Rocky Linux is an open source Linux distribution that is binary-compatible with Red Hat Enterprise Linux and is what RCS recommends.
For templates that support passwords, the generated password that appears after a VM is created is applied to the default username.
Security note: All VM templates are configured with SSH password authentication enabled. You should be able to SSH to your VM from another system connected to the same guest network. Do not expose port 22 unless required and we highly recommend using key based authentication.
Virtual machine credentials
VM templates that support password will have a randomly generated password set when the VM is first created or when a password reset request is made (available only when the VM is powered off). A randomly generated 6 character password will be displayed when a new password is set and appears as a notification in your CloudStack management console.

This password is set on the default username for your template. For example, the Rocky Linux VM template will set this password to the 'rocky' user account. You may become the super user by logging in as the rocky user and then running sudo su.
Note: If you specify a custom Cloud-Init config that creates additional users or sets account passwords, the displayed password will be overridden and have no effect.
Creating a custom template
Alternatively, you may decide to install a custom OS such as a different Linux distribution or other UNIX based operating systems and create a template from that. To create a custom template:
- Create a new virtual machine and select your custom ISO media. If you wish to upload your own ISO, see the 'register ISO' section below.
- Start the virtual machine and proceed through the OS setup process
- Once the system has been set up, prepare the VM to be templated by removing any host-specific files such as SSH host keys, static network configuration settings, temporary files and caches.
- Power off the virtual machine
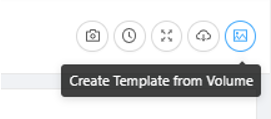
- Navigate to the virtual machine page and click on the 'create template' button
Registering a custom ISO
You may install custom ISO file into your CloudStack account either by directly uploading the ISO through the web console or by providing a URL to the ISO file on the internet.
Please do not install Windows on our CloudStack infrastructure. If you need a Windows VM, please contact us as we have alternative solutions.
Download a ISO from the internet
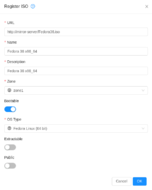
To add a custom ISO file from the internet, enter the CloudStack management console and navigate to: Images -> ISOs -> Register ISO
You may check the state of the ISO file by clicking on it and verify the state of the file. If the file is successfully downloaded, its ready state should become ‘true’. The ISO file will only appear in the selection list when the file is downloaded successfully.

Upload a custom ISO
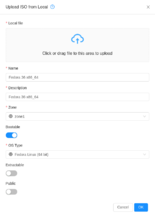
To upload an ISO file, enter the CloudStack management console and navigate to: Images -> ISOs -> Upload ISO from Local (icon)
Connecting to your VM console
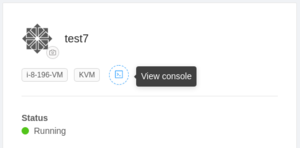
The CloudStack management console has a KVM (keyboard, video, mouse) feature built-in, allowing you to remotely connect to and interact with your virtual machine. To connect to your virtual machine's console, navigate to: Compute -> Instances -> Your Instance -> View console.
Expanding a VM disk
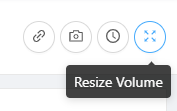
Virtual machine disks can be expanded after they are created within CloudStack. However, you will need to expand the partitions and filesystems manually.
To grow an existing disk:
- Go into your VM details page and click on ‘Volumes’.
- Click on the volume you wish to expand.
- Click on the ‘Resize Volume’ icon in the top right.
Once the volume has been expanded, you should be able to verify the disk volume has grown with lsblk. There should also be some messages by the kernel when this occurs. However, you will still need to expand any partitions, volumes, and filesystems on your system manually.
To expand your partition, use the growpart command followed by your disk device and partition number. Eg: /usr/bin/growpart /dev/vda 3
For LVM volume sets, you can expand the volume using the pvresize and lvresize commands:
/usr/sbin/pvresize -y -q /dev/vda3/usr/sbin/lvresize -y -q -r -l +100%FREE /dev/mapper/<volume-name>
To expand your filesystem:
- XFS:
/usr/sbin/xfs_growfs <volume> - EXT:
resize2fs <volume>
Destroying a VM
If you need to delete a VM, click on the red garbage bin icon in the VM instance page. All deletions are irreversible, so please make sure you have a copy of any data you need before proceeding.
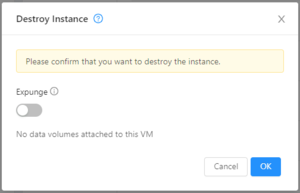
The VM root volume can be deleted immediately by enabling the 'Expunge' option in the dialog box. If left disabled, the VM root volume will linger for a day before it is deleted by the system. You may wish to expunge a volume if you are running low on space or volume quota.
Virtual machine networking
The CloudStack platform allows you to define custom virtual private cloud (VPC) network which can contain any number of guest networks that your virtual machines connect to. Each guest network has its own private network address space and is not directly routable from campus or the internet. For virtual machines that require internet access, the VPC or guest network it is connected to must have a NAT IP address associated. The following diagram shows how a guest network connects to the internet and campus network.
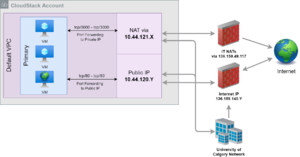
In order to expose a virtual machine's services to campus or the internet, the appropriate port forwardings must be set up on the VPC containing the guest network. More on this will be discussed in the next section.
Having multiple guest networks allows for more advanced network setups but is not required. We recommend using a single flat network for most workloads.
By default, all CloudStack accounts come with a default VPC and guest network set up with a NAT IP assigned.
IP addresses
Due to the design decisions made during the setup of the CloudStack platform, only internal 10.44.12X.X IPs can be assigned to your VPC. These IP addresses are accessible from the university campus network. However, there is a special section of IP addresses that can be accessed from the internet.
| IP address range | Accessible from | Internet IP mapping |
|---|---|---|
| 10.44.120.3-128 | Campus, Internet | 10.44.120.X maps to 136.159.140.X (ports 80 and 443 only) |
| 10.44.120.129-255 | Campus only | N/A |
| 10.44.121.0-255 | Campus only | N/A |
| 10.44.122.0-255 | Campus only | N/A |
| 10.44.123.0-255 | Campus only | N/A |
If you need a service exposed to the internet, please request for a public IP address using our ServiceNow request form. Additionally, if your service is not port 80 or 443, you must also request for a firewall change request to allow the special port through.
Exposing a network service to campus
In order to make a virtual machine be visible to the campus network, you must first set up a port forwarding from a campus IP address to your virtual machine.
To create a port forwarding, navigate to Network -> VPC -> Select your VPC -> Public IP Addresses. If you do not have any available IP addresses, you will need to click on 'Acquire New IP' and select an available IP address. Click on the IP address you wish to use to create a port forwarding on and then navigate to the 'Port Forwarding' tab. Enter the private port range, the public port range, the protocol, and select the target VM.
For example, to port forward only HTTP (tcp/80) traffic, you would enter the following:

Once the port forwarding is created, you should be able to access the service from on campus. If for some reason access to your service does not work, there may be a firewall restriction on IT's network. In such circumstances, please contact us for assistance.
Exposing a network to the internet
Exposing a service to the internet is the same as exposing it to campus. However, you must create a port forwarding on an IP address that maps to an internet IP address outlined in the IP address table above. If your account does not have one of these IP addresses available, please request for one on the ServiceNow request form.
By default, only ports 80 and 443 are allowed through the Internet IP address. For all other ports, please create a firewall rule change request in ServiceNow.
Cloud-Init Automation
Ubuntu
The following Cloud-Init configs apply to Ubuntu VM templates.
Ubuntu desktop
Use the following Cloud-Init config with the Ubuntu Server template to set up an Ubuntu desktop environment. The setup step takes a up to 15 minutes to complete and you should see a login screen when the setup finishes.
Adjust the root and user password as desired. Below, the test user password is set to blank, allowing you to login to Gnome without a password.
#cloud-config
disable_root: false

users:
  - name: user
    lock_passwd: false
    inactive: false
    gecos: Test User
    primary_group: user
    groups: wheel
    passwd: $1$ADUODeAy$eCJ1lPSxhSGmSvrmWxjLC1

chpasswd:
  list: |
    root:password
  expire: false

# Install a graphical desktop
runcmd:
  - DEBIAN_FRONTEND=noninteractive apt -y upgrade
  - DEBIAN_FRONTEND=noninteractive apt -y install tasksel
  - tasksel install gnome-desktop
  - systemctl set-default graphical.target
  - systemctl isolate graphical.target
Rocky Linux
The following Cloud-Init configs apply to Rocky Linux templates.
Rocky Linux Desktop
Use the following Cloud-Init config using the Rocky Linux template to set up a Rocky Linux desktop environment. The setup step takes up to 10 minutes to complete and you should see a login screen when the setup finishes.
Adjust the root and user password as desired. Below, the test user password is set to blank, allowing you to login to Gnome without a password.
#cloud-config
disable_root: false

users:
  - name: user
    lock_passwd: false
    inactive: false
    gecos: Test User
    primary_group: user
    groups: wheel
    passwd: $1$ADUODeAy$eCJ1lPSxhSGmSvrmWxjLC1

chpasswd:
  list: |
    root:password
  expire: false

# Install a graphical desktop
runcmd:
  - yum -y install "@Workstation"
  - systemctl set-default graphical.target
  - systemctl isolate graphical.target
Rocky Linux Docker host
Use the following Cloud-Init config using the Rocky Linux template to set up a new docker host. This server can then be used to run Docker containers. Also included are:
- The docker-compose utility to help deploy container stacks more easily
- A helper script to expand the
/varand/filesystems on first startup based on the available space in the ROOT volume.
Use the CloudStack generated password with the 'rocky' default user account to log in.
#cloud-config

write_files:
  - path: /usr/bin/expand_lvm_root
    content: |
      #!/bin/bash
      /usr/bin/growpart /dev/vda 3
      /usr/sbin/pvresize -y -q /dev/vda3
      /usr/sbin/lvresize -y -q -r -l +50%FREE /dev/mapper/*root
      /usr/sbin/lvresize -y -q -r -l +100%FREE /dev/mapper/*var/dev/mapper/*root
      /usr/sbin/xfs_growfs /
      /usr/sbin/xfs_growfs /var
    permissions: '0700'

  - path: /usr/bin/setup_docker
    content: |
      #!/bin/bash
      yum install -y yum-utils
      yum-config-manager \
         --add-repo \
         https://download.docker.com/linux/centos/docker-ce.repo
      yum install -y docker-ce docker-ce-cli containerd.io
      systemctl start docker
      systemctl enable docker

      curl -L "https://github.com/docker/compose/releases/download/1.29.2/docker-compose-$(uname -s)-$(uname -m)" -o /usr/local/bin/docker-compose
      chmod +x /usr/local/bin/docker-compose
    permissions: '0700'

  - path: /root/docker-compose.yml
    permissions: '0700'
    content: |
      version: '3.3'
      services:
        web:
          image: php:7.4-apache
          restart: always
          user: "0:0"
          volumes:
            - /var/www/html:/var/www/html
          ports:
            - "80:80"

  - path: /var/www/html/index.php
    permissions: '0644'
    content: |
      <h1>Hello there!</h1>
      <p>I see you from <?php echo $_SERVER['REMOTE_ADDR']; ?></p>
      <pre><?php print_r($_SERVER); ?></pre>

# Ensure VM has the largest / possible
runcmd:
  - /usr/bin/expand_lvm_root
  - /usr/bin/setup_docker
  - cd /root; docker-compose up -d
UC Authentication
Use the following Cloud-Init config to allow UC-based authentication. Local accounts with the same username as the IT account may use the IT credential to log in.
#cloud-config

write_files:
  - path: /usr/bin/setup_uc_auth
    permissions: '0700'
    content: |
      #!/bin/bash
      yum install -y sssd sssd-dbus sssd-krb5 krb5-workstation authselect-compat

      cat <<EOF > /etc/sssd/sssd.conf
      [sssd]
      config_file_version = 2
      services = nss, pam, ifp
      domains = uc.ucalgary.ca

      [domain/uc.ucalgary.ca]
      id_provider = files
      debug_level = 5
      auth_provider = krb5
      chpass_provider = krb5

      krb5_realm = UC.UCALGARY.CA
      krb5_server = ITSODCSRV14.UC.UCALGARY.CA:88
      krb5_validate = false
      EOF
      chmod 600 /etc/sssd/sssd.conf

      cat <<EOF > /etc/krb5.conf
      [logging]
       default = FILE:/var/log/krb5libs.log
       kdc = FILE:/var/log/krb5kdc.log
       admin_server = FILE:/var/log/kadmind.log

      [libdefaults]
       default_realm = UC.UCALGARY.CA
       dns_lookup_realm = false
       dns_lookup_kdc = false
       ticket_lifetime = 24h
       renew_lifetime = 7d
       forwardable = true

      [realms]
       UC.UCALGARY.CA = {
        kdc = itsodcsrv14.uc.ucalgary.ca
       }

      [domain_realm]
       uc.ucalgary.ca = UC.UCALGARY.CA
       .uc.ucalgary.ca = UC.UCALGARY.CA
      EOF

      mkdir -p /etc/authselect/custom/rcs
      cd /etc/authselect/custom/rcs
      echo H4sIAMYsbGIAA+0ca3PbuDGf+StQ34dLMpEtybLdUevO6BKl56mTuJGv7Uwmo4FISMKJBHQAaEfNub+9uwBJkXrLshxnjjuTyCKJfWF3sQsuFPhS9CtB79keoQpw2mjYT4DZz1r1uPGs1qhX6yf12vFx/Vm1Vqs1jp+R6j6ZSiHWhipCnikpzarn1t3/TuErj8bhhBzccjOs6Igq41MVHBDen71WUey3mCsWHNx5W4wKpT+qSAGjI3lDQxj8SarB0UDIiB2FcsBFRfuKMfHZY4L2QpYbS2MzZMJwnxouxfnXefQHTaNi9nufhprdpQj6XAyYGisuzHIUuYcWIhlTrW/lRkxMNdO0OH5HdHdeXlDNjAGCuhJQ0IM4GjPFx0Om4PGjDM9n8pULP4wDtpkik78q1Lec/WifcMr8kSyE7fB/a9ssYf8Q2PiPc6/3RmNN/K826mez8f/07LSM/48BR4uD8dGaWOytGbc8BK8buSTu5odtFEyPitGxDH2LYXai9kFjjf8fn4HPT/3/GPy/fnZ6Uvr/Y8BXiP/gTHHOL/KZ0Z2HRpGmD2meszi5mIExjbpM3BxquRuOgIkJICE/kE7qsKQYGwjXRbSrfD2Xxe7EVp/yEOMGsjZWzOLSPASuCHJ83iCxwPtdwyN2XqtXqwvYSpHMMKPjfp/7HHFtyIydrWBnXeeFQkT4fak4ZImulwh134n3POr7Mk50sTUWGMy0RoE2hnmRAJHDgzLtwk1ewffmJq/gXZiJBf9iTSaHZGvTA0ZoGGumdsakY1AxC7q8j9qJeUD+SmqwPhAQi5kC7k8B69M4NOc9GhA7TutzOSLIB4g1EvJWnHPIFhT77HBbE9hNXZBmRNxYi0yTlHvhyexaA9cYvhDkGCMZDTfGMmITLiw7wMGNHLECuq2ZCjnIZnVUyeHZmis90YZFNhDtJJ0Mgl9lrxuNhpDwBVxZi4ioHp1Xq2dni0bNu0k2GPwkz8yn1GBqJDWj1FSWCFUwTDCxG+4DHUF8JUXgzBNNrws2u9sspB65k+4SW99s/RdgyNz4w0OsA/eUY6yr/05rtdn8r35S1n+PAjaSBU1rPGA4pA8pjCaJG6NbsS8zbuWDxmTk6jTMogZKxmOHYDsMdiAgEMxkOKYIcp69DEE60CUaMsLQ3twSRzbQBgnr2XprRtKBiCMOJFMWRaoJXcAxn5rCiG9XcRbK7T3RWOP/pyen+fqvgf5/XC3rv0eBb17eYTIbsJDaGs/+cV53dlGWjfsuG+O6zWh8qP43hYW1UQUQ7aqYHC9CYh4P6fx9eanU+3SGn6xiqBGX7CU5X656mKZ/i6uRv52T+rQa2QV3sWbaaQZdwkjwrZSQxqlBxqYiYrCQ0UHTfd4RoybdPlfadDHiz0+V5mYjI1ivmm4i9W6CuSSW9KW6BfdbwnS5tVFubSxmJvUL0oM4wkRXD2kgb70fcnojt0CKUCB3S5IrYG3EZ8pQqO1sZqkJ+JLig6H5C/CgMUaPmQjgsiA6jFW0247Hg0yg5WNXfVkkXdDR2GzKzmacPLH9pPr3sZ20TTQe3/4W05Abm+0UwzyxyuyiGLorRTgpULr3YgPOdFKrE+dT2y49dqMEg6eRo93YSZaIZfjKfbkcmnJf7jvbl3ssGEtt7Gv4PdJYt/93Um/M1P81iC9l/f8YsKFFWydAP7eeZuvVTX13uaf+6X9kEEQv8991/DJZnwvYswJrLhTYGEmtDSNqWKlNNCa5Jj3LayV55KDpvv+uh/IWc00W3G3q1DOUkqIdatVxQGG1nmJ8Yh6+Gj62W2/etfdLY43/n1VPT3P+XwP/rzaOy/3/R4G27boinU7njS1/XKIwu1P2nIauGHcZpU2MsQgKJy+8813B8zosZD62dBEz5JqMlcStc1egsRyDVMMD4GoyVhAuZJ/wAJk0E4+Kud09wHID95U+BAI4OrmgCYWIY3C46x8DpJJEVNABSwtBg8lbJMGtIU0B1qTiTC8iEjF/SAXXkca6YYgcXr5pXb0i/2Cqx5QEJSnyVjF2cdU6JBcmYwKQkfedDkGcV613kLUYpvoUxDISdzycoMlkIF0yDuPBwOqiR32oaYPktgfM+lIIYNMKAnGSj0PkvN9nCmNUWqY4vaE+3uHuFBcwoZGTg/Ygc3dK9oGzHoPJjoEE7pIaOyO/Iv4x6KjpDY0Z6+bREXyLFTvk8ggHHkF+E3jeT5N0BXhVMBaK+2EQ6CHr6isZOVqKgpgKZRXJw+6dCYRvvO+BMbj5D8hziK/sxj08yU8DIzecZlnai0NyjTY0pDcMlQZKRSGFz7weE6zPQQ2QkbJUVn/InFE5wtgNhSqDJLIPsR4+KxEYgpq4R+1UmGGsPcgeY9AlEXEE82yNiesRrB9MWY2iln92HL9CcSYyJoG0hdItFXamRoyNEzXEQqD1g7bhOQXG6A+5YK/sKJgPzz5a8A1tXQb0ghz9GuPWBNdTT0mWVFQGw50LNAox8PAlL4dJc5Nu/Usb/B+KphEIr9DYwwkBtvG2GTpsCWpHLDep1iOSjRKLrIfEaDLD+Ql1bhROUl98/eH924u///KxdX3x4b1XmQPPa8EMOyFBb6hoiUpDH0MEP9qpmspySK5CRjWozNJ3j3iB9OMIptOJazDzYATsiDiXscPBDwx6P9TQwB75ADGtIGIqF72Bxd0qGFFNnRPmFm2Y4dsEIQn7wrWNZM6+CjyCUP9qXVy2frpskw9XKHnrkrxtt65/+djuLFBCThuFzbFm08OEJAndqXfjHSSM9Q9oAk3SSBvYJsiHZn5s+A2zQ2eiGCIGTYDN4k2vWKXNUMP3pTDKhyKLudFACB/Nh0q7VKSLBOqHK4vEbgMQW28cJkJlr1jm6OQ5tLaYPYoeC1Y3cLaQzj2aCITPITUWUfY0RObxWCqYZXQTnEpczNiXcch9bq09CTFIhAs7eKGNzXI82zecSHAJV4lraia3GNlojhf7zgmeZsE8urQsTfBs8t7qkLyXRNogGjEKSxlMxkzjNKJ67opwNI90i+RF5rGJ+Ck/ufbP9VOSe9h6no3Pbmpe5hoTX6bIkxc0KxFjOIdnwO3FIGRFfHB9Fhe+7Cniq0NUgqUUTPG+qItVQ4L9jQvfEIEx9OfrAdC91pg+BLFCHRcNPA5kgqFlN5vxAkYg8I8sraFpUmNzMHxAxXYhBOsJAp762REz/lHSYpBTg8taEiKvhwzsL9laRgNOuUoDBeoEvPS/eaOe7tsVhQXixF0HeRWNmMEZltNNEc97c9GxEa1z1X598fbiNaY1/764fv0zedO6bv3U6qyObdMY9x4XagjCr0jalAQJmqE9cG1tM7bexAbedAkEJ1K3ihu4C84XJw+BA2PgqRQam9w62Jeof7vQ2jJP21wHNO47G0yWGyO95P2dRbuINK57OH14TQqWECbzhD0uYJWgmXMVmmdA1ReO0EHSTZMJvIDoDArXMjPF4DphtkCQtd1McWQNNVugmXbeTPFMm2q2QJR130zxZH0126BJGnByWNyVdUja/2m9u7rMGavnvST58sitQeibOP1zy4vnkbwVpR+QFJMsDpBixF9OIV2ykJJdaNkmayzxCkvsOo6yJX7KIKRn7TZpXXY+TNXwEnMIO8ya9PM/v/iudjhKWAUf2//85eJj+137/XVnXzTWnv85qc7s/+C3cv/nMeAdHWGfinKJc6F4xDwzq5Jc7ZemiqTDkpBVLLEwJEUzewuuqNgPrOjYOrjzKjPhFgVK6+ZXENRSyfWKRDutDXguAjbX0CWkYpeYA8ySsJ/Avp8k5+RaxewAUX2CO5/hGXc08aHk3ZuaFzVqFA6JJZrOVwNLdJ0UBOttbEPKjynztNMtkTe5sExW61E2yaCRLTsiqBxCKzOmhZDrzr+CXEUV7cot+Ji32k2z6S7GiE3w3brbRLUkYZDfH+AmwNp3lKup7gvW9e8VtYwXH0rT6yh/A01nlB9P2/kX8ZXZlHCJphc1AaTavg9dQuymJtN2oxp3nC3yQoAoRoSHkdfGaLuD55vsJUNC+zClvQc9F+li7mEehuwausvW/+IB//3kGOvyv2L//wn2/zfqtTL/ewy45+//zJ8azyciT+JQwZPpsk/61GynaTfiGleOrqBQza/+LaHkr2kG+YBHD8oO6D9IB/RTbsZ9ooe7n37751Zsfdv2z7L/c8ruU+z/dJaxz9Of6/K/WrXWaMzkf7Wzk7My/3sMuF/+9yQSvH2cGt1n4vhA8U1IyLzdC57mIIiaX+DfCD9dy4GmN0w17Q+lVfJXRrkvxdB4n3OvmSwBvv4snnpMhQt4IlkuCZ7LaZOx9m/cNIZQazttyL2O4+7ww0kbmQhZyNbyH8wqT+R+hydyN1LQol+DWFYCZ9zU98jNyjcDy1131u9S1la4dM6d8WjX1JXvw0154jmjUZ54XoulrPeXMlOeeC5PPJcnnssTz+WJ52+95VXueGXsPsUdrxJKKKGEEkoooYQSSiihhBJKKKGEEkr448D/AT019aAAeAAA | base64 -d | tar -xzpf -

      if [[ "`authselect current -r`" != "custom/rcs" ]] ; then
        authselect select custom/rcs --force
        systemctl restart sssd
      fi

      systemctl enable sssd

runcmd:
  - /usr/bin/expand_lvm_root
CloudStack API
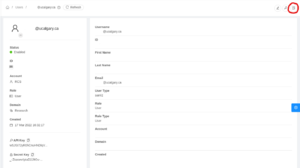
You can request for a CloudStack API key to automate infrastructure deployment using Terraform or CloudMonkey. A new API key can be generated by navigating to your profile page (top right) and then clicking on the 'Generate keys' button.
Terraform Integration
Terraform allows you to define infrastructure as code and can be used in conjunction with CloudStack to configure your virtual machines and guest networks. Use the official CloudStack provider.
The following is an example Terraform file for reference. Specify your CloudStack API keys either as a separate vars.tf.
# Configure the CloudStack Provider
terraform {
  required_providers {
    cloudstack = {
      source = "cloudstack/cloudstack"
      version = "0.4.0"
    }
  }
}

provider "cloudstack" {
  api_url    = "${var.cloudstack_api_url}"
  api_key    = "${var.cloudstack_api_key}"
  secret_key = "${var.cloudstack_secret_key}"
}

# Create a new VPC
resource "cloudstack_vpc" "default" {
  name = "wedgenet-vpc"
  display_text = "wedgenet-vpc"
  cidr = "100.64.0.0/20"
  vpc_offering = "Default VPC offering"
  zone = "zone1"
}

# Create a new ACL
resource "cloudstack_network_acl" "default" {
    name  = "vpc-acl"
    vpc_id = "${cloudstack_vpc.default.id}"
}

# One ingress and one egress rule for the ACL
resource "cloudstack_network_acl_rule" "ingress" {
    acl_id = "${cloudstack_network_acl.default.id}"

    rule {
        action       = "allow"
        cidr_list    = ["0.0.0.0/0"]
        protocol     = "tcp"
        ports        = ["22", "80", "443"]
        traffic_type = "ingress"
    }
}

resource "cloudstack_network_acl_rule" "egress" {
    acl_id = "${cloudstack_network_acl.default.id}"

    rule {
        action       = "allow"
        cidr_list    = ["0.0.0.0/0"]
        protocol     = "all"
        traffic_type = "egress"
    }
}


# Create a new network in the VPC
resource "cloudstack_network" "primary" {
    name = "primary"
    display_text = "primary"
    cidr = "100.64.1.0/24"
    network_offering = "DefaultIsolatedNetworkOfferingForVpcNetworks"
    acl_id = "${cloudstack_network_acl.default.id}"
    vpc_id = "${cloudstack_vpc.default.id}"
    zone = "zone1"
}

# Create a new public IP address for this network
resource "cloudstack_ipaddress" "public_ip" {
    vpc_id = "${cloudstack_vpc.default.id}"
    network_id = "${cloudstack_network.wosnet1.id}"
}

# Create VMs.
resource "cloudstack_instance" "vm" {
  count = 1
  name = "vm${count.index+1}"
  zone = "zone1"
  service_offering = "rcs.c4"
  template = "RockyLinux 8.5"
  network_id = "${cloudstack_network.wosnet1.id}"

  # Cloud Init data can be used to configure your VM on first startup if your template supports Cloud Init
  user_data = <<EOF
#cloud-config

# Require specific packages
packages:
 - tmux
 - git
 - tcpdump

EOF
}
Troubleshooting
Cannot create a volume snapshot
Volume snapshots can only be taken on VMs that are powered off.
Cannot create a VM snapshot
Disk-only VM snapshots cannot be taken when the VM is running. If you intend to snapshot a running system, you must also snapshot its memory.
VM state is still running after shutdown
After running 'shutdown' on a VM, the VM state reported by CloudStack is still running.
Please try to do a force shutdown from the CloudStack management console. The VM state isn't updated by CloudStack and as a result, the state of a VM isn't properly reflected when power state changes outside of CloudStack (likely a bug?)