How to get a MARC account: Difference between revisions
Jump to navigation
Jump to search
| (9 intermediate revisions by 3 users not shown) | |||
| Line 1: | Line 1: | ||
This page describes the process of obtaining an account and how to login to the | This page describes the process of obtaining an account and how to login to the MARC Cluster. If you are looking for information about the MARC cluster hardware, please see the [[Marc Cluster Guide]]. | ||
= Obtaining | == Obtaining a MARC account == | ||
== | |||
== | === Prerequisites === | ||
# Navigate to the IT Homepage: www.ucalgary.ca/it | * Access will only be granted to MARC for those with one or more [https://ucalgary.service-now.com/kb_view.do?sysparm_article=KB0030163 SCDS] project share as this is the only to get data into MARC. | ||
* Account applicants must have an '''active UCalgary IT account'''. For external researchers/collaborators, a [[External collaborators|General Associate]] is required. | |||
=== Requesting a MARC account === | |||
# Navigate to the IT Homepage: [https://www.ucalgary.ca/it www.ucalgary.ca/it] | |||
# Click Login in the upper right corner | # Click Login in the upper right corner | ||
# Click "Order Something" | # Click "Order Something" | ||
| Line 17: | Line 19: | ||
# Someone should reply to you when your account is ready. | # Someone should reply to you when your account is ready. | ||
= Logging in to MARC = | == Logging in to MARC == | ||
= | |||
== | === Prerequisites === | ||
In order to access MARC, please ensure that you have: | |||
# Enabled MFA on your University of Calgary IT account. | |||
# Requested for and have received your MARC account | |||
# | |||
# | |||
=== | === Accessing MARC === | ||
# | MARC can only be accessed via the Citrix NetScaler. You can access Citrix directly both from on-campus and off-campus without using the IT General VPN. | ||
# | # Navigate to https://myappmf.ucalgary.ca | ||
# You may need to log in with MFA. | |||
=== | ==== Add Applications ==== | ||
# | After logging in to Citrix, you will need to launch PuTTY To connect to MARC. | ||
# Enter "marc.ucalgary.ca" | # On the Citrix NetScalar page, click on Apps in the top navigation menu. | ||
# Click the PuTTY icon to start PuTTY [[File:RdhAddPutty.png|thumb|none]] | |||
# Click Open. You will be presented with a black terminal screen prompting for | # After launching PuTTY, you should see the PuTTY configuration menu: [[File:RdhPuttyConfiguration.png|thumb|none]] | ||
# | # Enter "<code>marc.ucalgary.ca</code>" as the host name. Optionally, you may save this as the default setting (although the settings may not be persistent in this environment). | ||
# Click Open. You will be presented with a black terminal screen prompting for a username.[[File:RdhPuttyLogin.PNG|thumb|none]] | |||
# Enter your University of Calgary IT username and hit enter. | |||
# Enter your University of Calgary IT password when prompted. | |||
# If the log in is successful, you should see the MARC banner: | |||
<PRE> | <PRE> | ||
login as: myusername | login as: myusername | ||
| Line 63: | Line 64: | ||
</PRE> | </PRE> | ||
Now you may return to the [[Marc Cluster Guide]] page | Now you may return to the [[Marc Cluster Guide]] page | ||
[[Category:MARC]] | |||
[[Category:Guides]] | |||
Latest revision as of 20:33, 17 June 2025
This page describes the process of obtaining an account and how to login to the MARC Cluster. If you are looking for information about the MARC cluster hardware, please see the Marc Cluster Guide.
Obtaining a MARC account
Prerequisites
- Access will only be granted to MARC for those with one or more SCDS project share as this is the only to get data into MARC.
- Account applicants must have an active UCalgary IT account. For external researchers/collaborators, a General Associate is required.
Requesting a MARC account
- Navigate to the IT Homepage: www.ucalgary.ca/it
- Click Login in the upper right corner
- Click "Order Something"
- Click "Research Computing"
- Click "Medical Advanced Research Computing (MARC)"
- Select "Add Access" from the "What would you like to do?" box
- Choose your SCDS share from the next box
- Type a synopsis of the work you plan to do into the "Business Reason" box.
- You may leave the Additional Information box empty
- Someone should reply to you when your account is ready.
Logging in to MARC
Prerequisites
In order to access MARC, please ensure that you have:
- Enabled MFA on your University of Calgary IT account.
- Requested for and have received your MARC account
Accessing MARC
MARC can only be accessed via the Citrix NetScaler. You can access Citrix directly both from on-campus and off-campus without using the IT General VPN.
- Navigate to https://myappmf.ucalgary.ca
- You may need to log in with MFA.
Add Applications
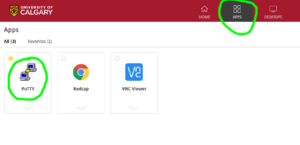
After logging in to Citrix, you will need to launch PuTTY To connect to MARC.
- On the Citrix NetScalar page, click on Apps in the top navigation menu.
- Click the PuTTY icon to start PuTTY

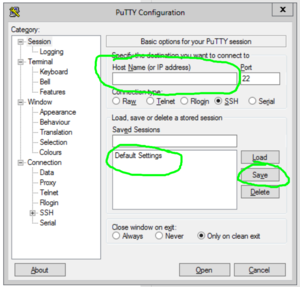
- After launching PuTTY, you should see the PuTTY configuration menu:

- Enter "
marc.ucalgary.ca" as the host name. Optionally, you may save this as the default setting (although the settings may not be persistent in this environment). - Click Open. You will be presented with a black terminal screen prompting for a username.
- Enter your University of Calgary IT username and hit enter.
- Enter your University of Calgary IT password when prompted.
- If the log in is successful, you should see the MARC banner:
login as: myusername
myusername@marc.ucalgary.ca's password:
Last login: Thu Apr  9 13:12:21 2020
===========================================================================
                  ___________________________________
                      _   _    __     ____       __
                      /  /|    / |    /    )   /    )
                  ---/| /-|---/__|---/___ /---/------
                    / |/  |  /   |  /    |   /
                  _/__/___|_/____|_/_____|__(____/___
                         marc.ucalgary.ca
               Problems or deficiencies? Send email to:
                       support@hpc.ucalgary.ca

===========================================================================


SYSTEM NOTICES:
[myusername@marc ~]$
Now you may return to the Marc Cluster Guide page
